Project 2: Barrel Bouncer VR Edition
Part 1: Setting Up Your Project for VR
In this section, you’ll be applying some general project-wide settings that will optimize the performance for mobile VR. Then, you will install the XR development tools that you will use to build your app and do some basic set up in your scene to get it to work with the Oculus Quest headset and controllers.
General Project Settings
Build Settings
First, open up your Build Settings and modify the following:
- Uncheck the Main Menu scene from the build so that your Gameplay scene is the only one that is selected. In order to simplify this project and make it easier for you, we have decided to break the game logic flow a little bit so that you are only dealing with one scene.
- Since the Oculus Quest is an Android-based VR headset, you should switch the platform to Android.
- Change the Texture Compression setting to ATSC. Oculus recommends using this for mobile VR to provide the best balance between quality and file size.
Player Settings
Next, go in to your Player Settings and modify the following:
- General
- Product Name: LastName_FirstName_BarrelBouncer_VR
- This is the name of the app that you will see when it is installed to the headset.
- Product Name: LastName_FirstName_BarrelBouncer_VR
- Other Settings
- Rendering
- Multithreaded Rendering: ✓
- This will distribute graphics API calls across multiple threads, which can have a positive effect on CPU intensive applications.
- Static Batching: ✓
- Dynamic Batching: ✓
- Batching refers to grouping or combining multiple meshes together so that they share materials and can be drawn on the display with fewer draw calls. Static batching refers to the process of doing this for GameObjects marked as static (or stationary) whereas dynamic batching refers to the process of doing this on non-static GameObjects that could move around. Each is slightly different, as we will discuss in class. For more iinformation, see this page on the Unity documentation.
- Compute Skinning: ✓
- This setting allows the GPU to take care of skinning animated meshes, thus freeing up the CPU.
- Multithreaded Rendering: ✓
- Identification
- Package Name: com.LastName.FirstName.BarrelBouncer.VR
- This is your app’s unique identifier on the headset (and the Quest Store).
- Minimum API Level: Android 6.0 ‘Marshmallow’ (API level 23)
- Apps for the Oculus Quest make use of features that were only introduced in Android 6.0, and thus you should set the minimum API level to this.
- Package Name: com.LastName.FirstName.BarrelBouncer.VR
- Configuration
- Scripting Backend: IL2CPP
- The IL2CPP scripting backend has many benefits, as described in project 0. Most notably, it can improve performance and make your app run quicker on the device as compared to the Mono scripting backend.
- Scripting Backend: IL2CPP
- Optimization
- Prebake Collision Meshes: ✓
- This generates the colliders during build time rather than runtime, which can increase app size but decrease the scene loading times.
- Keep Loaded Shaders Alive: ✓
- This can solve problems related to compiling shaders at runtime, but can increase the initial loading times.
- Optimize Mesh Data: ✓
- This removes the rendering data during the build that isn’t actually used by a mesh’s material.
- Prebake Collision Meshes: ✓
- Rendering
- XR Settings
- NOTE: Do NOT select any of these options. These refer to Unity’s built-in XR platform integrations, which has been deprecated in Unity 2019.3 as they transition over to their new XR plug-in framework that we will be using for this project. Check out this blog post for more information on the change.
Quality Settings
So far, you’ve been opening up your Player Settings by clicking on the button in your Build Settings. However, the Player Settings are a small part of a larger set of settings for your project called Project Settings. The Project Settings window can also be launched by going to your menu bar and clicking on Edit -> Project Settings. Each type of project settings can be found on the tabs along the left fourth of the window.
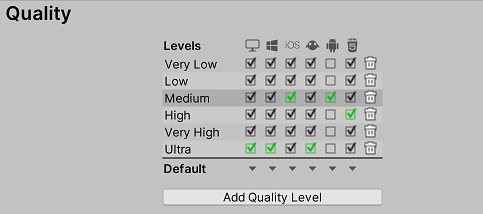
One type of of project settings is the Quality Settings, which we will be modifying in this section. The first quality settings we will have to change are the Quality Levels. Since we are only building to the Android platform, we only care about the levels in the Android column. Make the Medium level the default level for Android and unselect all other levels so that they won’t be used. The default level for each platform is indicated by the green box. Below is a screenshot of what the level settings should look like.
Next click on the Medium level so that you can modify the quality settings for that level to the values listed below:
- Rendering
- Anti Aliasing: 4x Multi Sampling
- This is a graphics processing technique that smoothes out the edges of shapes and refines its understanding of the edges as you move around the scene over time. Without this setting, it is possible that your environment can appear to be glitchy when you move.
- Anti Aliasing: 4x Multi Sampling
- Shadows
- Shadows: Hard Shadows Only
- This creates much sharper edges and distinction between shadows rather than having them fade gradually but greatly increases performance.
- Shadows: Hard Shadows Only
- Other
- V Sync Count: Don’t Sync
- This disables Unity’s feature of synchronizing rendering with vertical blanks. You should turn this off because the Oculus Runtime handles it’s own V Sync.
- V Sync Count: Don’t Sync
Graphics Settings
The Graphic Settings are another type of project settings that you will have to modify to optimize it for performance on mobile VR systems.
Go onto the Tier Settings, uncheck the Use Defaults option for all tiers, and apply the following settings for each tier:
- Standard Shader Quality: Low
- Rendering Path: Forward
- Realtime Global Illumination CPU Usage: Low
Downloading the XR Plugins and SDKs
There are two main tools we will need to obtain to get this project to work with VR: the Oculus XR Plugin, which is installed via Unity’s XR Management system, and the Oculus Integration SDK, which is installed via the Asset Store.
XR Management and the Oculus XR Plugin
As mentioned above, Unity has a new XR plug-in architecture that you should use to install and load the plugins for the XR platforms you would like your application to support. Below are the steps to install and set up the Oculus XR Plugin:
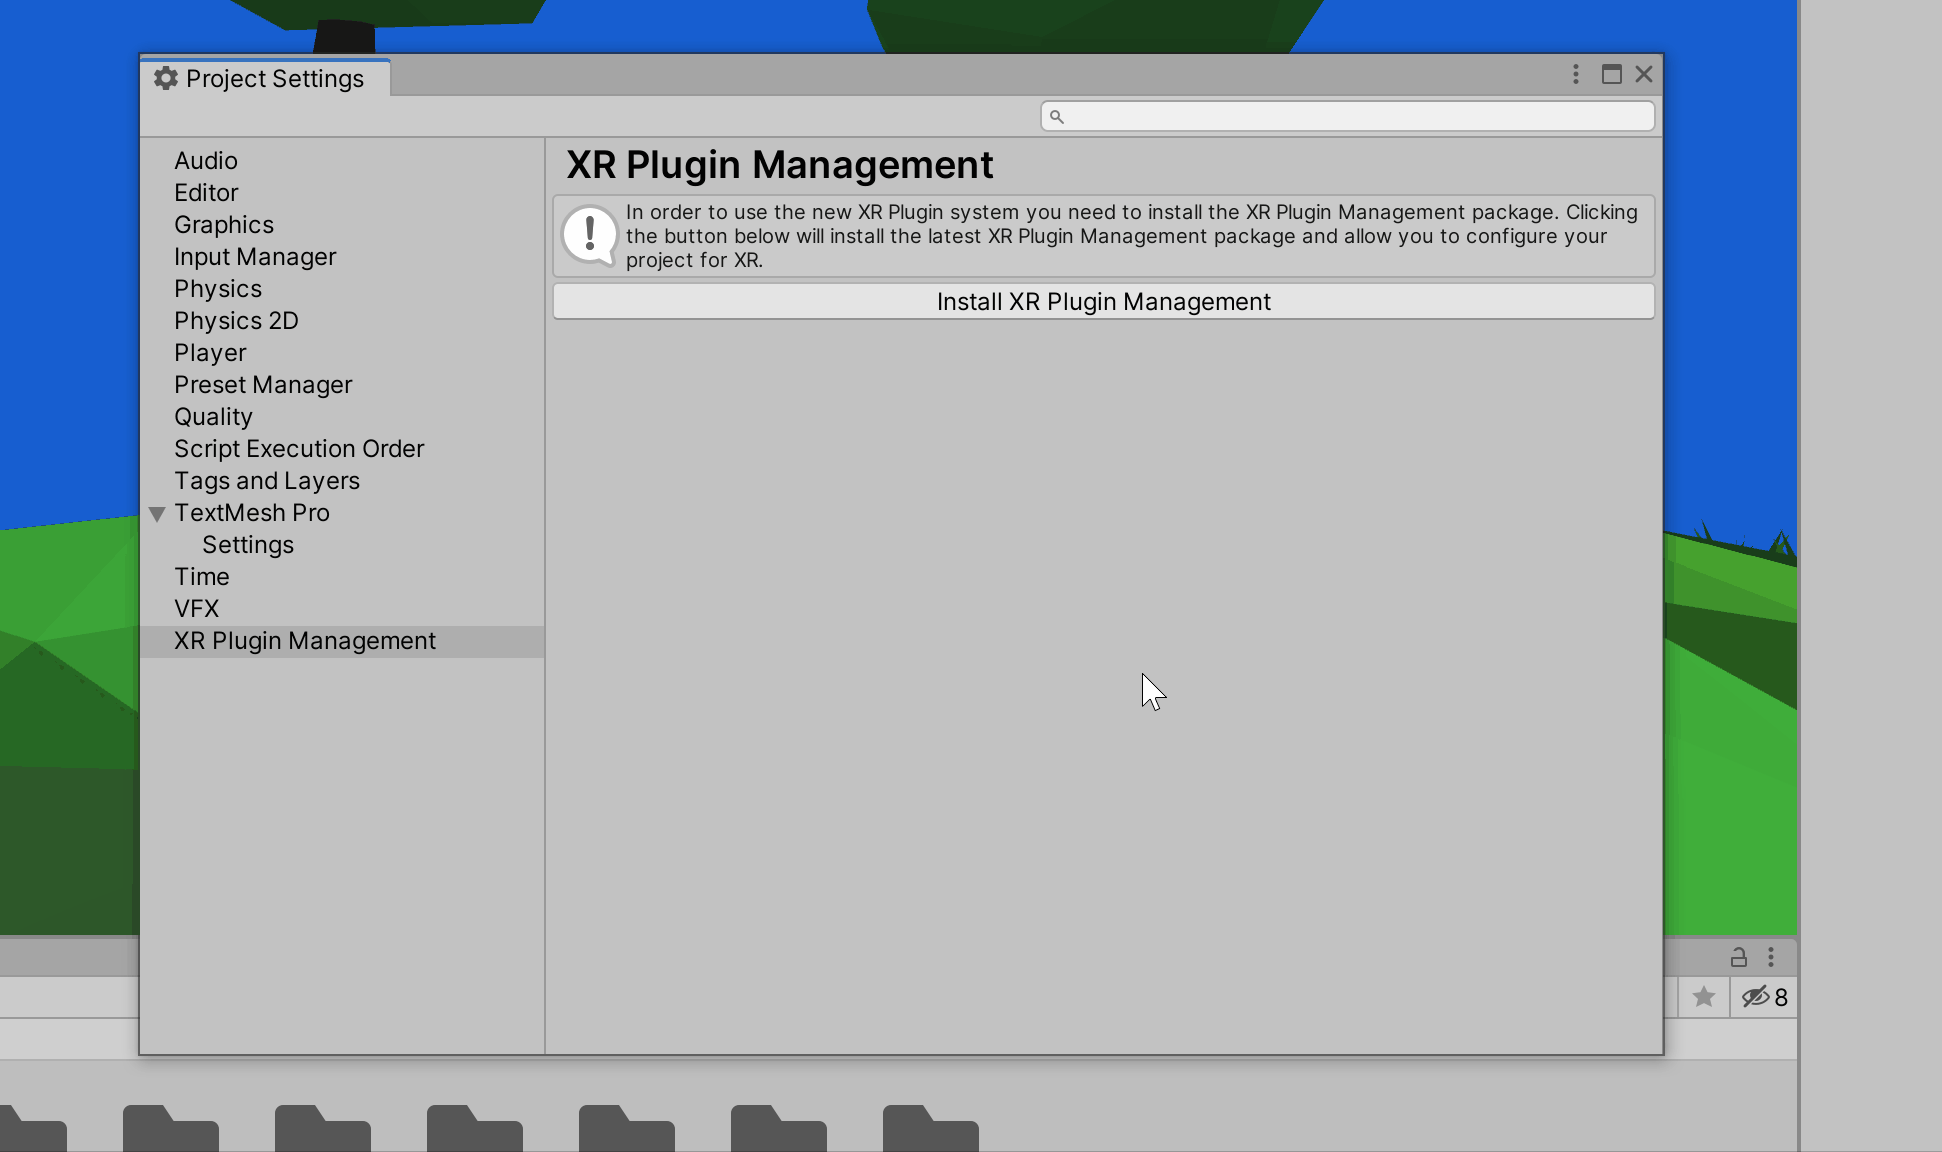
- In the same Project Settings window that you used above, click on the XR Plugin Management tab and then click on the Install XR Plugin Management button.
- Once this has completed, install the Oculus XR Plugin.
- Add the Oculus Loader to the list of Plugin Providers.
- Click on the Input Helpers subtab of the Project Settings and then click on the Install Legacy Input Helpers Package button.
- Click on the Oculus subtab of the Project Settings and then create a new serialized instance of the settings data.
- Change the Stereo Rendering Mode to Multiview. In Unity, each of the eyes of a VR headset is considered as its own separate camera/display, which can cause redundant computational and graphical workloads and thus significantly reduce performance. The Single Pass Stereo rendering mode provides some optimizations for a VR setup so that both cameras can share some computations and the same GameObjects are rendered onto both displays before iterating on to the next GameObject. Multiview is built on the same infrastructure as Single-Pass Instancing, but relies on the mobile graphics driver’s implementation of certain optimizations rather than Unity’s. To learn more about Single Pass Stereo rendering, check out this page on the Unity documentation.
The Oculus Integration
The Oculus Integration is a 3rd-party vendor-specific SDK provided by Oculus and as such can be found on the Asset Store. Once you find the Oculus Integration, download and import it into your project. Note that this step could take 15-30 minutes to complete, so it is advisable to work on something else while this finishes in the background. If you get popups saying that there are newer versions of plugins available, go ahead and select the option to upgrade them.
NOTE: The Oculus Integration defines its own Player Controller script, which can conflict with the script you defined and thus cause errors. As such, you should rename your script in order to avoid these errors, both by renaming the file itself from the project window and by changing the class name from within the file contents itself.
The Oculus Integration also includes many example scenes that showcase how to implement various VR features and setups using the Oculus Integration’s components and prefabs. These example scenes constitute its “Sample Framework”. Scenes that are part of the Sample Framework can be found in the following folder: Assets -> Oculus -> SampleFramework -> Usage. They may be a useful reference to you as you work on this project. The documentation that explains how each of the scenes work can be found at this link.
Basic Scene Setup
Headset Tracking
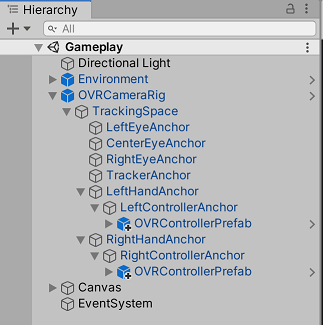
First, you should delete your Player GameObject from your scene and also make sure there are no other Cameras in your scene. The Oculus Integration already contains two prefabs that can act as a Player GameObject: the OVRCameraRig and the OVRPlayerController. For this project, we will use the OVRCameraRig prefab as our player GameObject, which is located in Assets -> Oculus -> VR -> Prefabs. Go ahead and drag this prefab into your scene, make sure its position and rotation are set to (0, 0, 0), and set its tag to “Player”.
The OVRCameraRig GameObject contains a few important components. The OVR Camera Rig component automatically adjusts the player’s camera’s translational and rotational movement based on the motion of the headset. The OVR Manager component provides the main interface to the VR hardware. The OVR Headset Emulator is supposed to allow you to simulate headset rotations from within the Unity Editor on your computer, but it only works with Windows and it doesn’t seem to work with the latest Unity version anyway.
You will need to set two properties of the OVR Manager component:
- Target Device: Quest
- Tracking Origin Type: Floor Level
- This allows you to track position and orientation relative to the floor, based on the user’s standing height.
Controller Tracking
The OVR Manager also keeps track of the controllers’ movements and then appropriately adjusts the LeftControllerAnchor and RightControllerAnchor GameObjects to stay in sync with these motions. As a result, any 3D model or GameObject that is a child of the LeftControllerAnchor GameObject will also have its position automatically adjusted by the left hand controller’s movements, since its transform is defined relative to its parent.
The LeftControllerAnchor is a child GameObject of the LeftHandAnchor GameObject, which is a a child GameObject of the TrackingSpace GameObject, which is a child GameObject of the OVRCameraRig GameObject. The RightControllerAnchor also has a similar hierarchy structure.
The Oculus Integration also provides an OVRControllerPrefab, which determines and displays a model of the correct type of controller in your scene based on the type of headset you’re using (i.e. Oculus Go controlller, Gear VR controller, Oculus Quest Touch controllers, etc.). The OVRControllerPrefab is also located in the following folder: Assets -> Oculus -> VR -> Prefabs. Go ahead and create two instances of the OVRControllerPrefab, one as a child GameObject of the LeftControllerAnchor and one as a child GameObject of the RightControllerAnchor. Then, on the OVR Controller Helper component, specify the Controller type as L Touch and R Touch, respectively.
Once you have completed the scene setup, your hierarchy should look like this:
Closing Notes
By this point, you should technically be able to build your app, run it from the Oculus Quest, and be able to look around your scene and see your controllers. However, you can’t actually see any of your canvases, you can’t move across large distances in your environment, and you can’t interact with any of the objects in your scene! For the rest of this project, you’ll be working to restore these interactive functionalities for this VR experience.